29.2.12

Week 5: Sheeting the roof and laying radiant heating tubing.

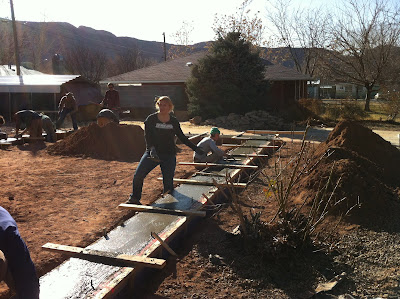
At the end of last week and starting this week work continued on the roof and on our interior floor. We split into two groups to construct our end gables and eyebrows, sheet each side of the roof, and take turns shoveling gravel in and leveling the interior of the house. We formed 6 inch interior shear walls between our bedrooms and bathrooms. To insulate our floors, we first laid 2 inches of insulation board, then stapled our radiant in-floor water tubes in serpentine patterns on the floor. To maintain building code standards, each of our bathroom floors is poured concrete.

We are running radiant heating tubes through both the concrete and our adobe floors. It took some clever calculation on Eric's part to ensure we were using the proper amount of tubing in each of our heating zones. The radiant heating will pass hot water through the floor, starting on the north side of the house, which will receive less passive solar heat through the windows. The water then twists down to the south floor, which will receive more sunshine and will likely maintain, if not increase, the heat of the water in the tubing. This tubing system distributes heated water through the floor to keep the homeowners' toes toasty. It will be the only embodied energy heat input in the house- the passive solar and in-floor radiant heat, combined with excellent insulation from our straw bales, will keep the house comfortably warm year round.

24.2.12

Week 4: Pushing up trusses.

Seeing our beams up made us interns realize we were actually building a house. Then we started putting the trusses on, probably the most harrowing experience of the build so far. Each side is lifted to the top of the beams, then we use a long two-by-four to push the peak of the truss into place. Teams at ladders on each end nail the truss into place, while Eric hangs off the last truss and adds supporting boards on top.

Week 4: Pulling the concrete forms and insulating the foundation.

We peeled the tarp blankets back from our concrete foundations to find that they set well over the weekend. The next steps for the foundation were wrapping it in more insulation panels to be at least 3″ thick. When we poured concrete, we set bolts close to the edge of the exterior wall. Now we drills holes through pressure treated two-by-fours to match the bolts. This forms a rail inside the perimeter of the foundation that we will nail our framing into. The most difficult part was chiseling out wood in spots where the bolt wasn’t the perfect height. While many of us worked on these tasks, one intern, or Eric, was handling the power digger (it definitely has a more specific name that I cannot currently remember). We were all thankful for the hours of digging it saved us. Our plumber, Mancus installed our bathroom and kitchen pipes and water lines, as well as potential future greywater pipes.

17.2.12

Week 3: Ground breaking and forming and pouring the foundation.

Wednesday morning we met up for the official groundbreaking ceremony. Emily said a few words about the gaining in momentum of community rebuilds and everything we were hoping to accomplish with this build (below).
Standing across from us were friends of the organization, the board of directors, neighbors, and the cat that visits us every morning, who goes by Snufflekins, Litterbiscuits, or Dr. Meow (below).
When the crowd cleared out, Tony started up the Bobcat and leveled the house site for us. Then we measured out the space our foundations will take up, plus room on each side to move. Kelly is checking how level the foundation trenches are with a laser level (below).
Then we pull out the Dr. Seuss looking pounding machine- jumpingjack or wackerpacker- to ensure our base earth was firm and ready to receive concrete. Eric shows Claire how to use it below.
Next we add stakes, guided by our exterior lines, and set up rails to hold foam insulation and the poured concrete. End of a cold, damp Wednesday.


The next morning, we have formed a box perimeter to pour concrete into. This is a shallow foundation, the center will be filled with some gravel. The straw bales and radiant-heated adobe floor will sit on top.
Kelly Ray and Dave pay as a visit with densely packed straw bales from Colorado, we were all so happy to see Kelly Ray again!
Alyssa is extremely useful in small places, like the top of the straw bale shelter.
I got to be my dad for a day as I tie rebar together that will reinforce the concrete.
At the end of the day we were all ready to go for concrete...except for a bummer mistake we made on both short sides of the foundation. We left the worksite concerned about fixing the problems before the inspector showed up Friday at 1 and the concrete truck at 2.

On Friday morning, we finished the adjustments, finish tying rebar, spray for termites, check all our pipes (electric, sewer, water, greywater). A neighbor down the street, Kathy, brought us fresh baked bread, covered in butter, with sides of honey and homemade peach jam for a mid-morning snack. We loved it! What a welcoming neighborhood!
In the afternoon, our forms passed inspection and the concrete truck rolled in. We took turns shoveling the concrete, magging (leveling the concrete into the forms), and working the surface to a smooth finish.
Friday evening, after a long week of work, we drove up to Slickrock trail, climbed up some rocks, and watched the beautiful sunset.


14.2.12

Week 3

All day Monday, we ripped recyclable and resuable materials out of the trailer: sinks, cabinets, tiling, light fixtures, copper pipes and wire, plates, doors, and of course appliances. We tore a few windows out for a future green house project. We stored appliances for the future homeowners and took other reusables to Wabi Sabi. At the end of the day, the trailer was gutted and ready to load onto axles.

Tuesday morning, we gathered to discuss our independent design projects and were treated to donuts by Emily. Eric Plourde guided us through the basic elements and steps of developing a plan for clients. We will meet with the homeowners, Eric and Nancy, to deliver our final plans in mid May. The projects include: 1) rainwater catchment, 2) greywater filtering and use, 3) permaculture landscaping, and 4) solar hot water heater for an outdoor shower- to be installed at the Community Rebuilds campus house.

Behind us, Darren and his crew were adding the tongue and axles to the trailer. They had a clever system of ratcheting the trailer sideways by using a roller and rail. We said over and over "I can't believe they're going to be able to drive this outta here". Around one o'clock, we watched as the trailer left the site. We soon followed in cars to watch the final disposal by Grand County Solid Waste at the debris dump.

Returning to the site in the afternoon, we marked out the dimensions of the straw bale and earthen plaster home we will be building. We busted out the Pythagorean theorem to ensure our corners were squared- 3-4-5- a blast from our geometry past.

Tomorrow morning is groundbreaking. Later this week or early next week the concrete foundation will be poured!

12.2.12

Bureau of Unknown Destinations

An NYC gallery has come up with a way to experience a place with few expectations- because you have no idea where you are going:

11.2.12

Day 8: Demo start.


Today is Friday, the truss group was allowed to sleep in an extra hour, thankfully.
We gathered at the build site to start tearing apart exterior elements on the trailer. I got pretty excited to slam the plywood skirting off with a sledgehammer. After realizing that I was beating up my back, I switched pace and built a little brochure box to attach to our Community Rebuilds sign. The box was made from the former newspaper box attached to the trailer. We also started digging holes to determine the course of the sewer line.

Since the semester is getting busy in a hurry (redundant?), I will be posting pictures weekly from now on.

Thanks for reading! Please leaves questions or comments on our building, the organization, or anything I write.

-Lauren

Day 8: Demo start.

Today is Friday, the truss group was allowed to sleep in an extra hour, thankfully.
We gathered at the build site to start tearing apart exterior elements on the trailer. I got pretty excited to slam the plywood skirting off with a sledgehammer. After realizing that I was beating up my back, I switched pace and built a little brochure box to attach to our Community Rebuilds sign. The box was made from the former newspaper box attached to the trailer. We also started digging holes to determine the course of the sewer line (turquoise).

Since the semester is getting busy in a hurry (redundant?), I will be posting pictures weekly from now on.

Thanks for reading! Please leaves questions or comments on our building, the organization, or anything I write.

-Lauren

Day 7: Finished the trusses!

On day two we arranged all our cut board in piles on the deck. We assembled one truss, then screwed in guide boards to act as a mold for the next 17 trusses.

When a truss is assembled on the floor, we staple all the joining seems (powerful staple guns that often jam), then add plates over the joints. The plates are somewhat like metal velcro- a really disturbing texture to grab haphazardly with your hands. We add one more staple to the plate to hold it on, then pop the truss out of the mold.
We lift the truss onto the rollers and nail the same plates to the other side of the joints.
Lastly, we run the trusses through a press (in the background, below) which presses the plates into the wood, making one strong, unified truss.
We made 24 trusses total, all pressed in one day! Two different sizes: 18 through the center of the roof, and 6 for the sides that have a shorter pitch.

Woman boxer and painter from Durango, CO

I enjoyed this woman's attitude toward training oneself, in this case, she is an undefeated boxer. Also, her attitude on expression. An inspiring combination.

http://www.bbc.co.uk/news/magazine-16880075

8.2.12

Day 6: Building cabinets and trusses.

For Wednesday through Friday we will be building the trusses and the cabinets for the straw bale house. We joined Chris and Francisco in the wood shop for some training on power tools (and of course safety). The interiors of the cabinets were cut, pieced together, then glued and stapled by Matt and Cali (below).
Next up is the Alderwood, assembled and sanded to beauty by Alyssa.


Out back, Jason, Kelly, and Jerry were cutting the longest beams for the trusses. Inside, Claire and I cut the smaller pieces for the trusses out of stud material. Below Claire is looking for which way the board bows to determine which edge will be up for a supportive beam.
Once we figured out how to use our speed squares and the angles on the chop saw, we flew through all the cuts.

Day 5: Getting organized and acquainted with the site.


This morning we selected our individual work projects. I was really happy to get the greywater system, as I would eventually like to live in a house that uses filtered water and outputs greyater for the yard. Then we hauled our work trailer to the site and split into a few groups. Some folks built us sturdy stairs for the trailer, some organized the trailer, others worked on pulling rocks and other features out of the lawn. By lawn, I mean lot covered in gravel. The gravel is terrible looking, but will come in handy to fill the concrete foundation. There is an old rose bush in the center of the yard that should just barely clear the edge of the new house. We are hoping to keep it alive and work around it.

Below: Our first lunch together on the jobsite.

Day 4: Mountain biking intro.


We could not start ripping up the jobsite until the final papers were signed between the owner of the trailer lot and Community Rebuilds. So, the couple we are building the house for, Eric and Nancy, took us mountain biking! They guide camping tours all over the west, based out of Las Vegas, and also guide day trips to biking trails in the Moab area. We originally planned to bike Dead Horse Point (where Thelma and Louise ran the car over a cliff), but the mixed weather up top led us to try the Lazy EZ and Bar M trails below the point. Everyone had a great time on the bikes, with only two folks skidding out or falling off (myself included). At the end of the trip a wave of snow swept over us for about 20 minutes. It was in the upper 40s or, so the snow only sticks in the shadows around here lately.


3.2.12

Day 3: Tour de Strawbale.

Our first Friday in Moab. We met the couple that we will be building a house for: Nancy and Eric (another Eric). They joined us for a tour of 8 different strawbale and natural-built homes, in 3 different areas. First we went out to Castle Valley. Here are some pictures of the landscape and homes.


We rode back into town and saw a couple of houses in the Mulberry Grove intentional community, which includes orchards, space for organic farming, and excludes cars in its interior streets. More information available at: http://www.mulberrygroveonline.com/

An exciting visit for me was Doni Kiffmeyer and Kaki Hunter's home in Moab. I moved to Moab with their book, a great foundation on earthbag building: Earthbag Building: The Tools, Tricks, and Techniques. Their plot is their laboratory for discovering the best mixes of earth materials, new and refined techniques, and how earthen structures age. Hearing their ideas directly and realizing how central Moab is to the natural building community in our country has motivated the interns to learn as much as possible while we live here.


The last house we visited was the most whimsical and impressive. It is truly a design-build masterpiece: